Simulation
Simulating the VSLAM UAV pipeline is a great way to test your code without the need for a physical drone. This tutorial will show you how to set up the VSLAM UAV simulator on your local machine using Docker and Isaac Sim 4.2.
Prerequisites
Before you begin, make sure your workstation meets the following minimum requirements:
- OS: Ubuntu 22.04
- CPU: Intel Core i7 (7th Generation) / AMD Ryzen 5
- CPU Cores: 4
- RAM: 32GB
- Storage: 50GB SSD
- GPU: NVIDIA GeForce RTX 3070
- GPU Driver: NVIDIA Driver 550 or newer
- VRAM: 8GB
Please follow the official NVIDIA Driver Installation instructions to install the latest NVIDIA driver.
Make sure you also install Docker (recommended 27.2.0 or newer). It is also recommend you follow the Linux Post-Installation Steps as well to manage Docker as a non-root user.
You can verify your Docker installation via:
$ docker run hello-world
If you haven't already, clone the VSLAM UAV git repository:
$ cd ~
$ git clone https://github.com/bandofpv/VSLAM-UAV.git
NVIDIA Container Toolkit
The NVIDIA Container Toolkit is required to run NVIDIA GPU-accelerated applications in Docker containers.
Configure the production repository:
$ curl -fsSL https://nvidia.github.io/libnvidia-container/gpgkey | sudo gpg --dearmor -o /usr/share/keyrings/nvidia-container-toolkit-keyring.gpg \
  && curl -s -L https://nvidia.github.io/libnvidia-container/stable/deb/nvidia-container-toolkit.list | \
    sed 's#deb https://#deb [signed-by=/usr/share/keyrings/nvidia-container-toolkit-keyring.gpg] https://#g' | \
    sudo tee /etc/apt/sources.list.d/nvidia-container-toolkit.list
Update the packages list from the repository:
$ sudo apt update
Install the NVIDIA Container Toolkit packages:
$ sudo apt install nvidia-container-toolkit
Configure the Docker container runtime by using the nvidia-ctk command:
$ sudo nvidia-ctk runtime configure --runtime=docker
Restart the Docker daemon:
$ sudo systemctl restart docker
Verify the installation by running a sample CUDA container:
$ sudo docker run --rm --runtime=nvidia --gpus all ubuntu nvidia-smi
Install Isaac Sim
Start by downloading Isaac Sim 4.2 which is the latest version supported by the Pegasus Simulator extension which is required to integrate a PX4 backend. Currently, the traditional method of installing Isaac Sim via the Omniverse Launcher is not supported and must be installed manually:
$ mkdir ~/isaacsim
$ cd ~/Downloads
$ wget https://download.isaacsim.omniverse.nvidia.com/isaac-sim-standalone%404.2.0-rc.18%2Brelease.16044.3b2ed111.gl.linux-x86_64.release.zip
$ unzip "isaac-sim-standalone@4.2.0-rc.18+release.16044.3b2ed111.gl.linux-x86_64.release.zip" -d ~/isaacsim
$ rm isaac-sim-standalone@4.2.0-rc.18+release.16044.3b2ed111.gl.linux-x86_64.release.zip
Next, install Isaac Sim by running the following commands one after another:
$ cd ~/isaacsim
$ ./omni.isaac.sim.post.install.sh
$ ./isaac-sim.selector.sh
These commands will take a while to run. Please don't close the terminal or interrupt the process.
Install Pegasus Simulator
Pegasus Simulator is a Isaac Sim extension for the PX4 autopilot. It provides a realistic simulation environment for testing and developing autonomous drones.
Start by configuring the environment variables for Pegasus Simulator. Open a terminal and run the following commands:
$ cd ~/VSLAM-UAV/sim/setup
$ ./env_variables.sh
$ source ~/.bashrc
Check that the environment variables are set correctly by running the following command:
$ ISAACSIM
This should open the Isaac Sim application. If it does not, please check that the ISAACSIM_PATH variable is set correctly in your ~/.bashrc file.
Next, we need to install the Pegasus Simulator extension. Open a terminal and clone the Pegasus Simulator repository:
$ cd ~
$ git clone https://github.com/PegasusSimulator/PegasusSimulator.git
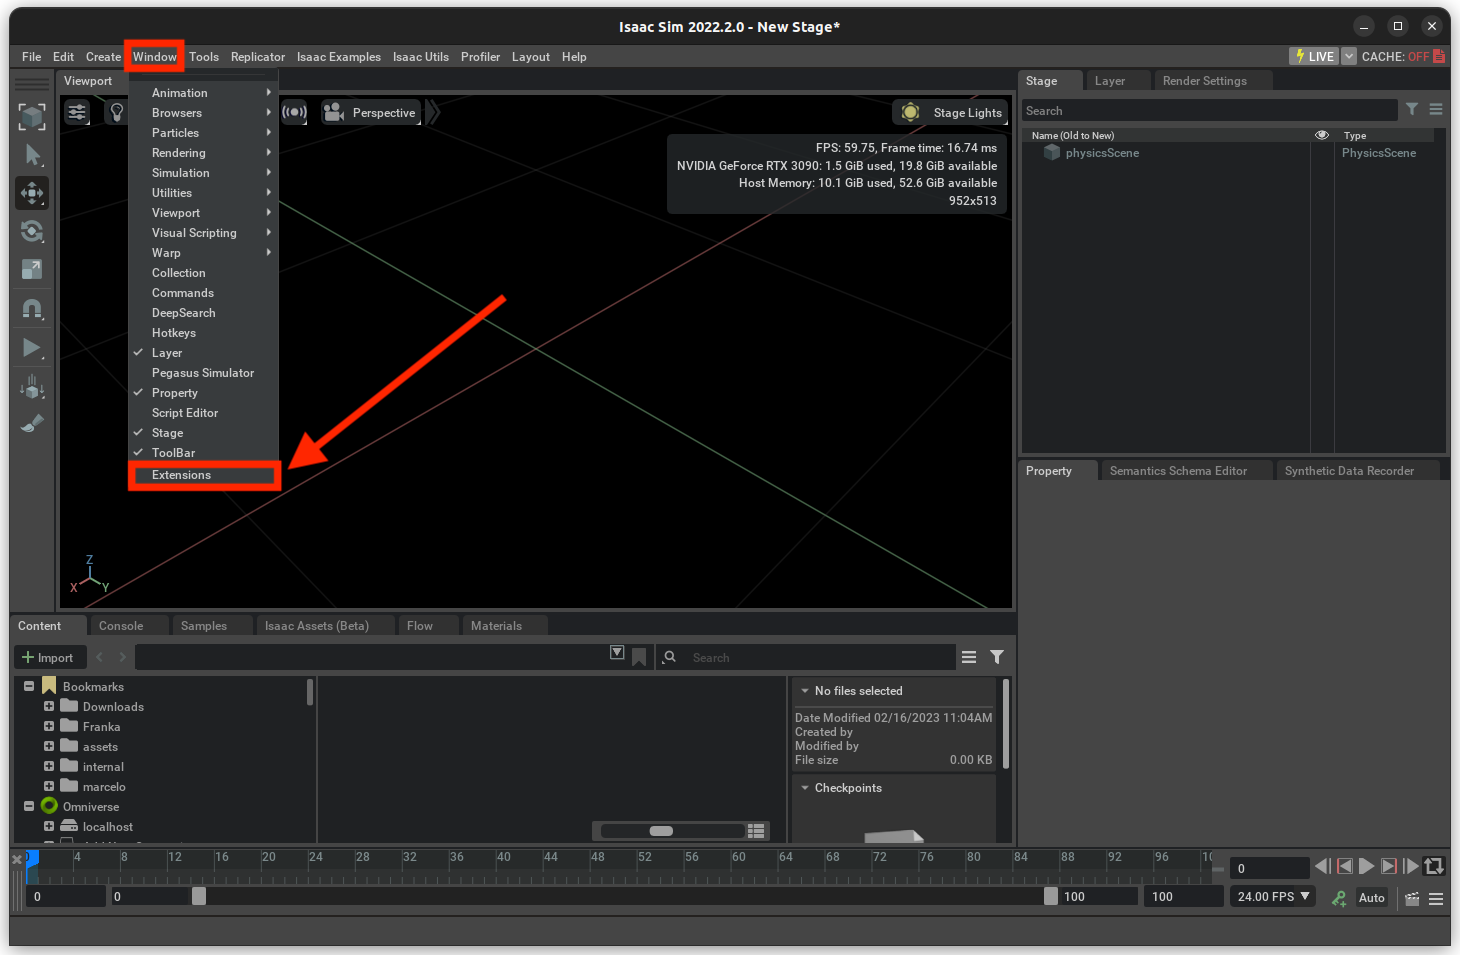
Launch the Isaac Sim application and open the Window->extensions on the top menu bar:
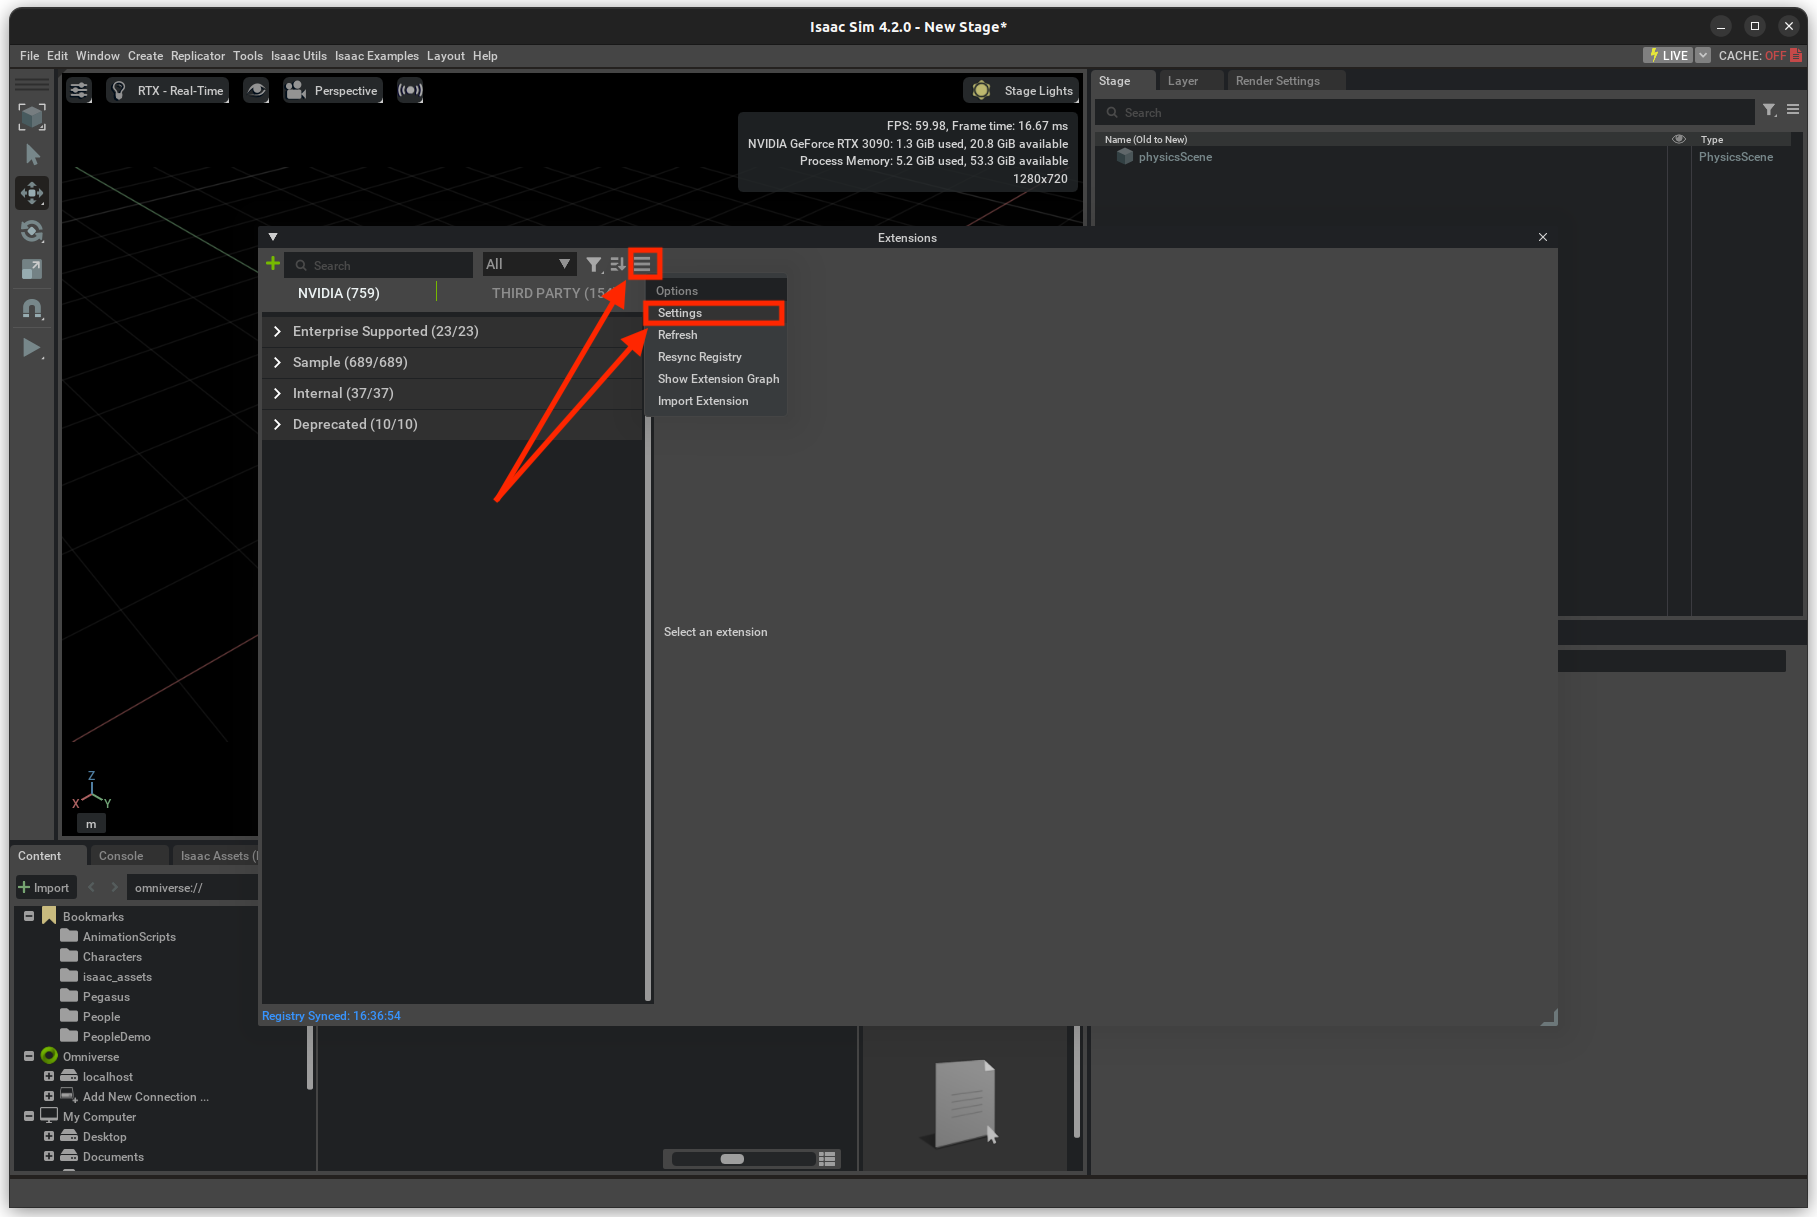
In the Extensions window, click on the Options icon and select Settings to add a path to the Pegasus Simulator repository:
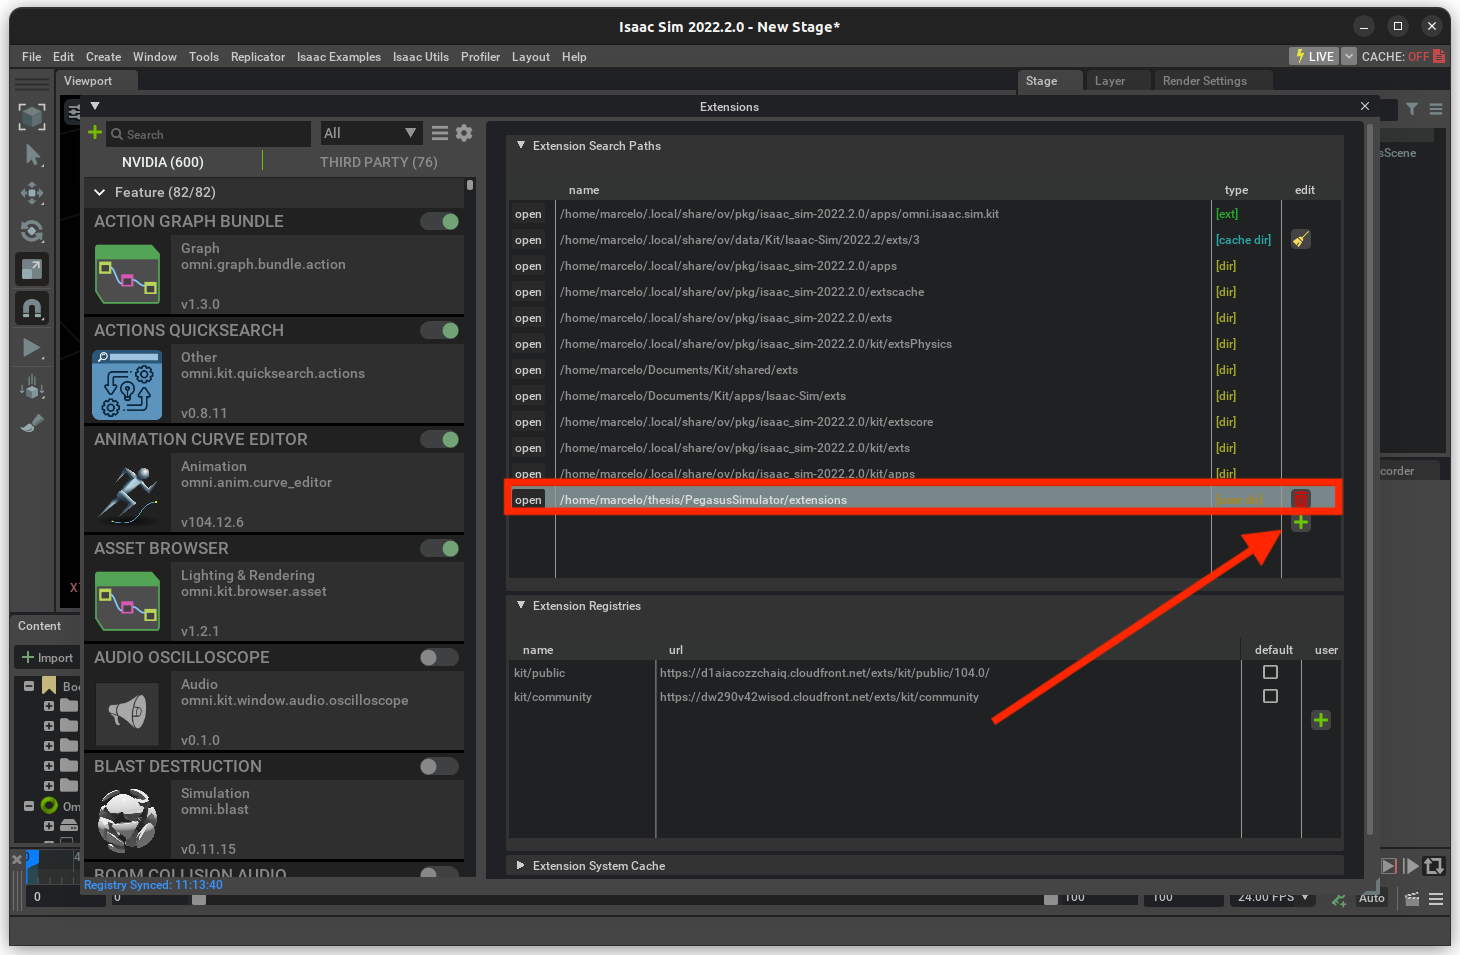
Insert the path to the Pegasus Simulator repository followed by /extensions in the Extension Search Paths field:
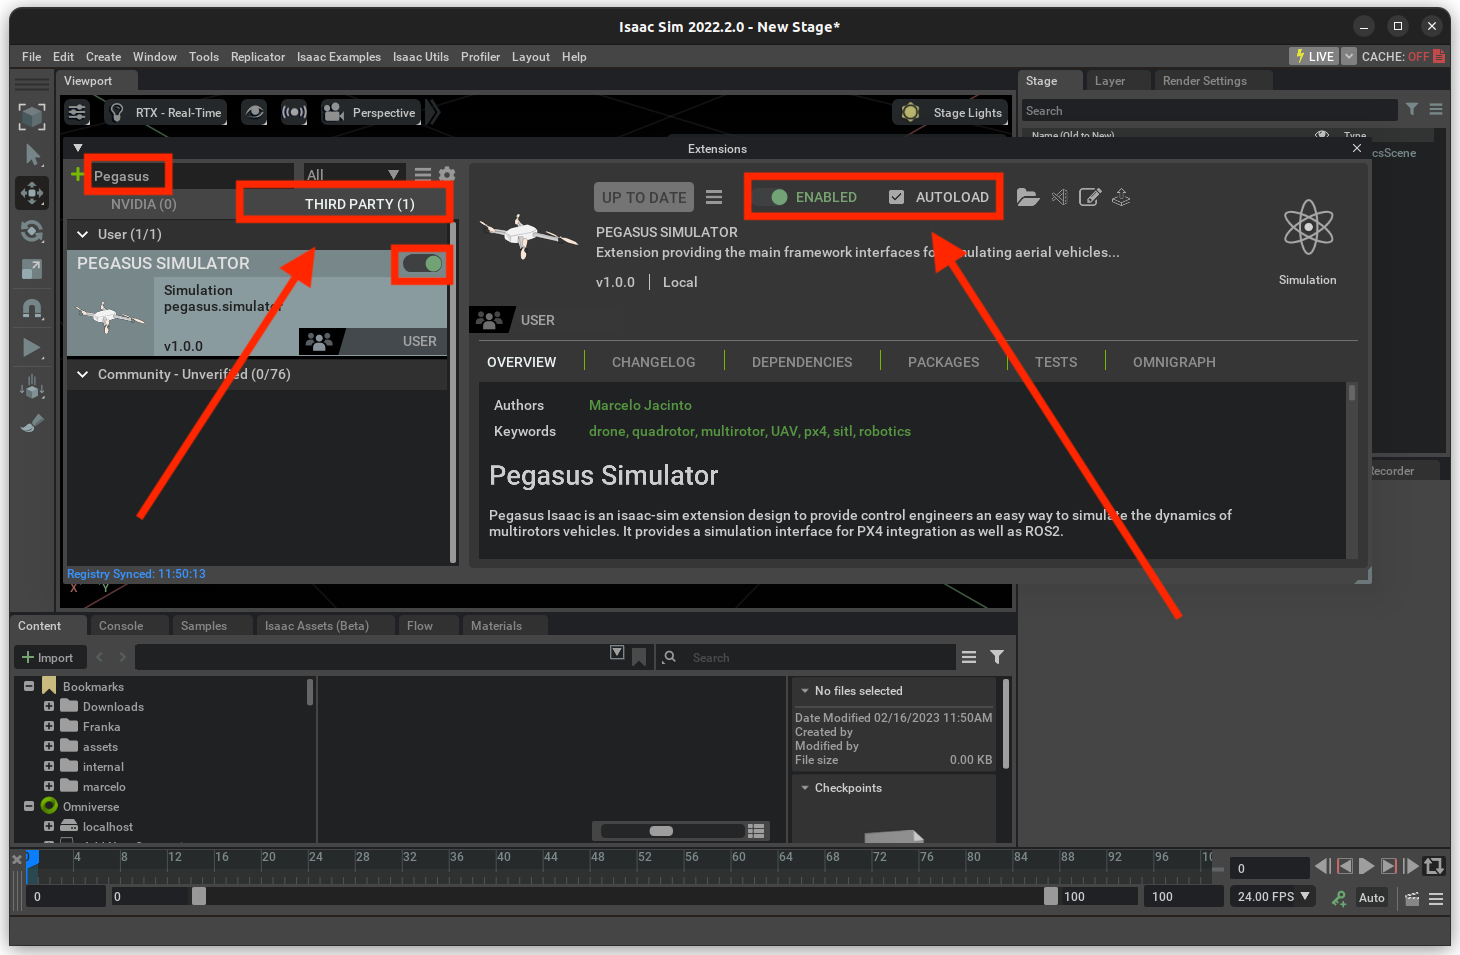
Next, enable the Pegasus Simulator extension in the third-party extensions tab and enable autoload:
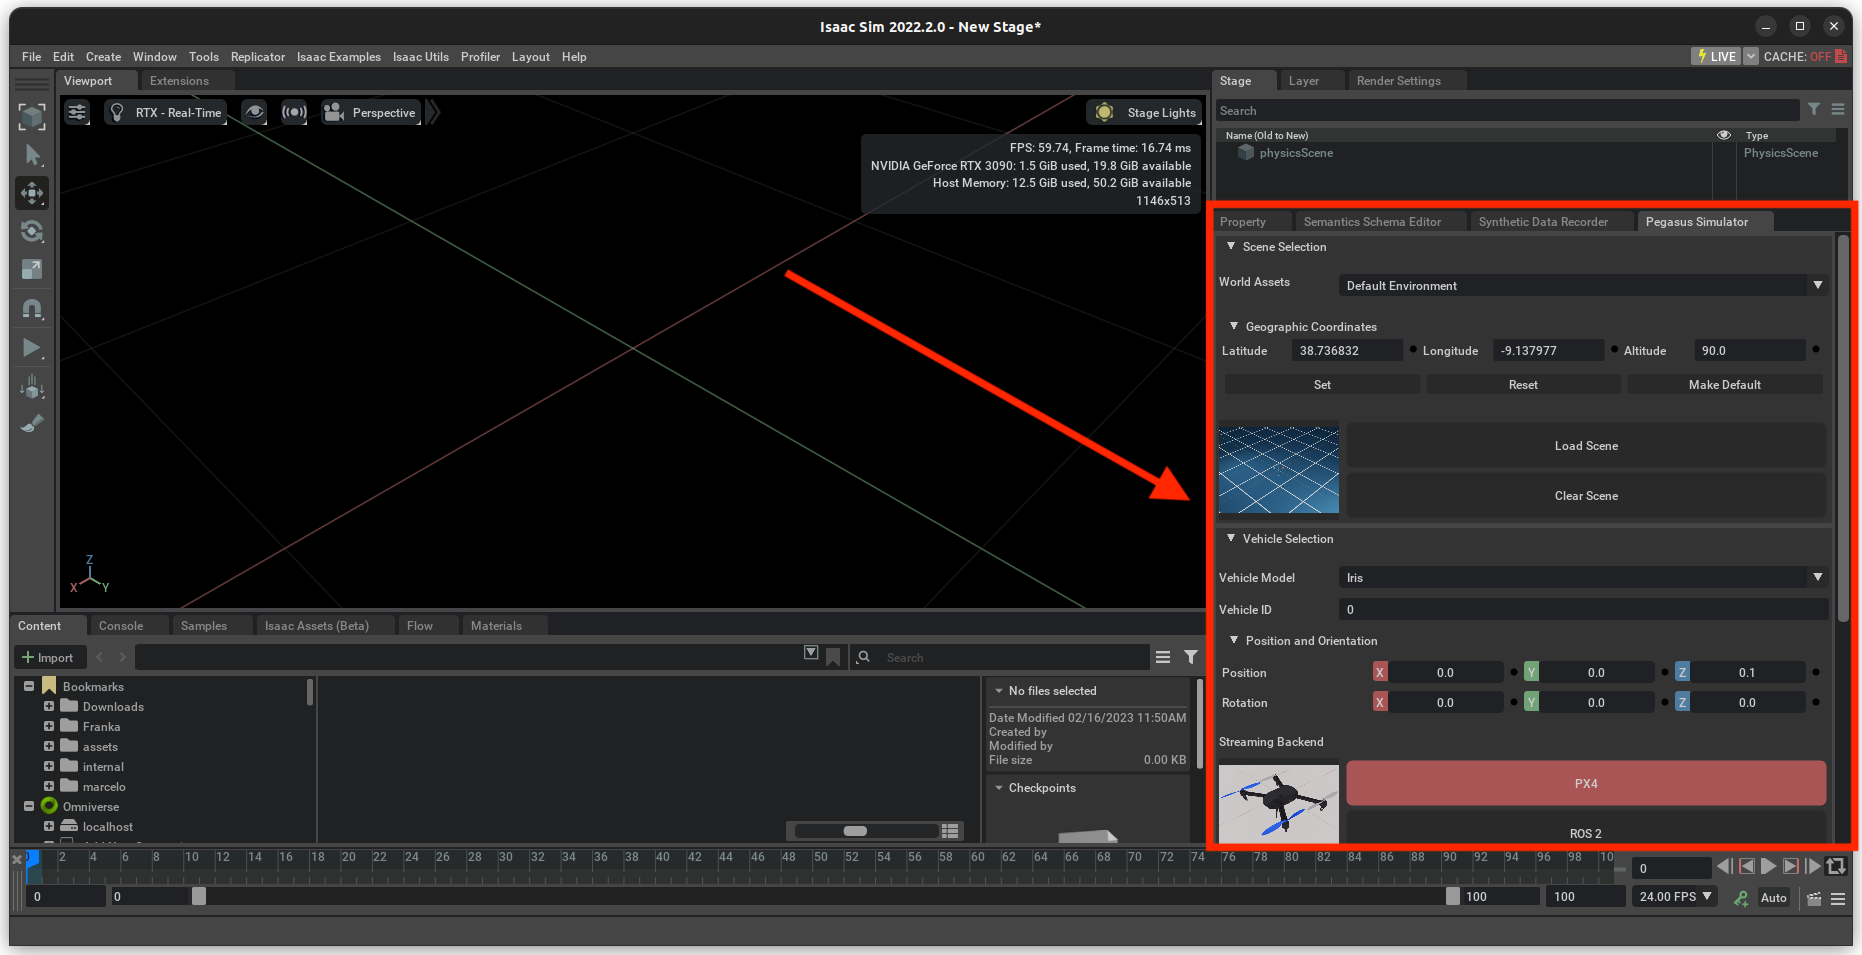
Verify that the extension is loaded by checking the Pegasus Simulator window on the bottom right of the Isaac Sim application:
Now, install the Pegasus Simulator as a Python module to use it in Python scripts. Open a terminal and run the following commands:
$ cd ~/PegasusSimulator/extensions
$ ISAACSIM_PYTHON -m pip install --editable pegasus.simulator
Check that you can launch the simulator from a python script (standalone mode):
$ ISAACSIM_PYTHON ${ISAACSIM_PATH}/standalone_examples/api/omni.isaac.core/add_cubes.py
This should open the Isaac Sim application and add cubes to the world.
Run the following command to add the custom VSLAM UAV model to the Pegasus Simulator extension:
$ cd ~/VSLAM-UAV/sim/setup
$ ./sim_assets.sh
Install PX4-Autopilot
If you wish to use the Pegasus Simulator GUI (in extension mode), you must install PX4-Autopilot:
Start by cloning the PX4-Autopilot repository:
$ cd ~
$ git clone https://github.com/PX4/PX4-Autopilot.git
Check out the latest stable release:
$ cd ~/PX4-Autopilot
$ git checkout v1.14.3
$ git submodule update --init --recursive
Next, install the required dependencies:
$ sudo apt install make cmake python3-pip
$ pip install kconfiglib jinja3 jsonschema pyros-genmsg packaging toml numpy future empy==3.3.4
$ cd ~
$ ./PX4-Autopilot/Tools/setup/ubuntu.sh
Compile the PX4-Autopilot source code:
$ make px4_sitl_default none
Press CTRL+C upon seeing the following message:
[100%] Built target px4
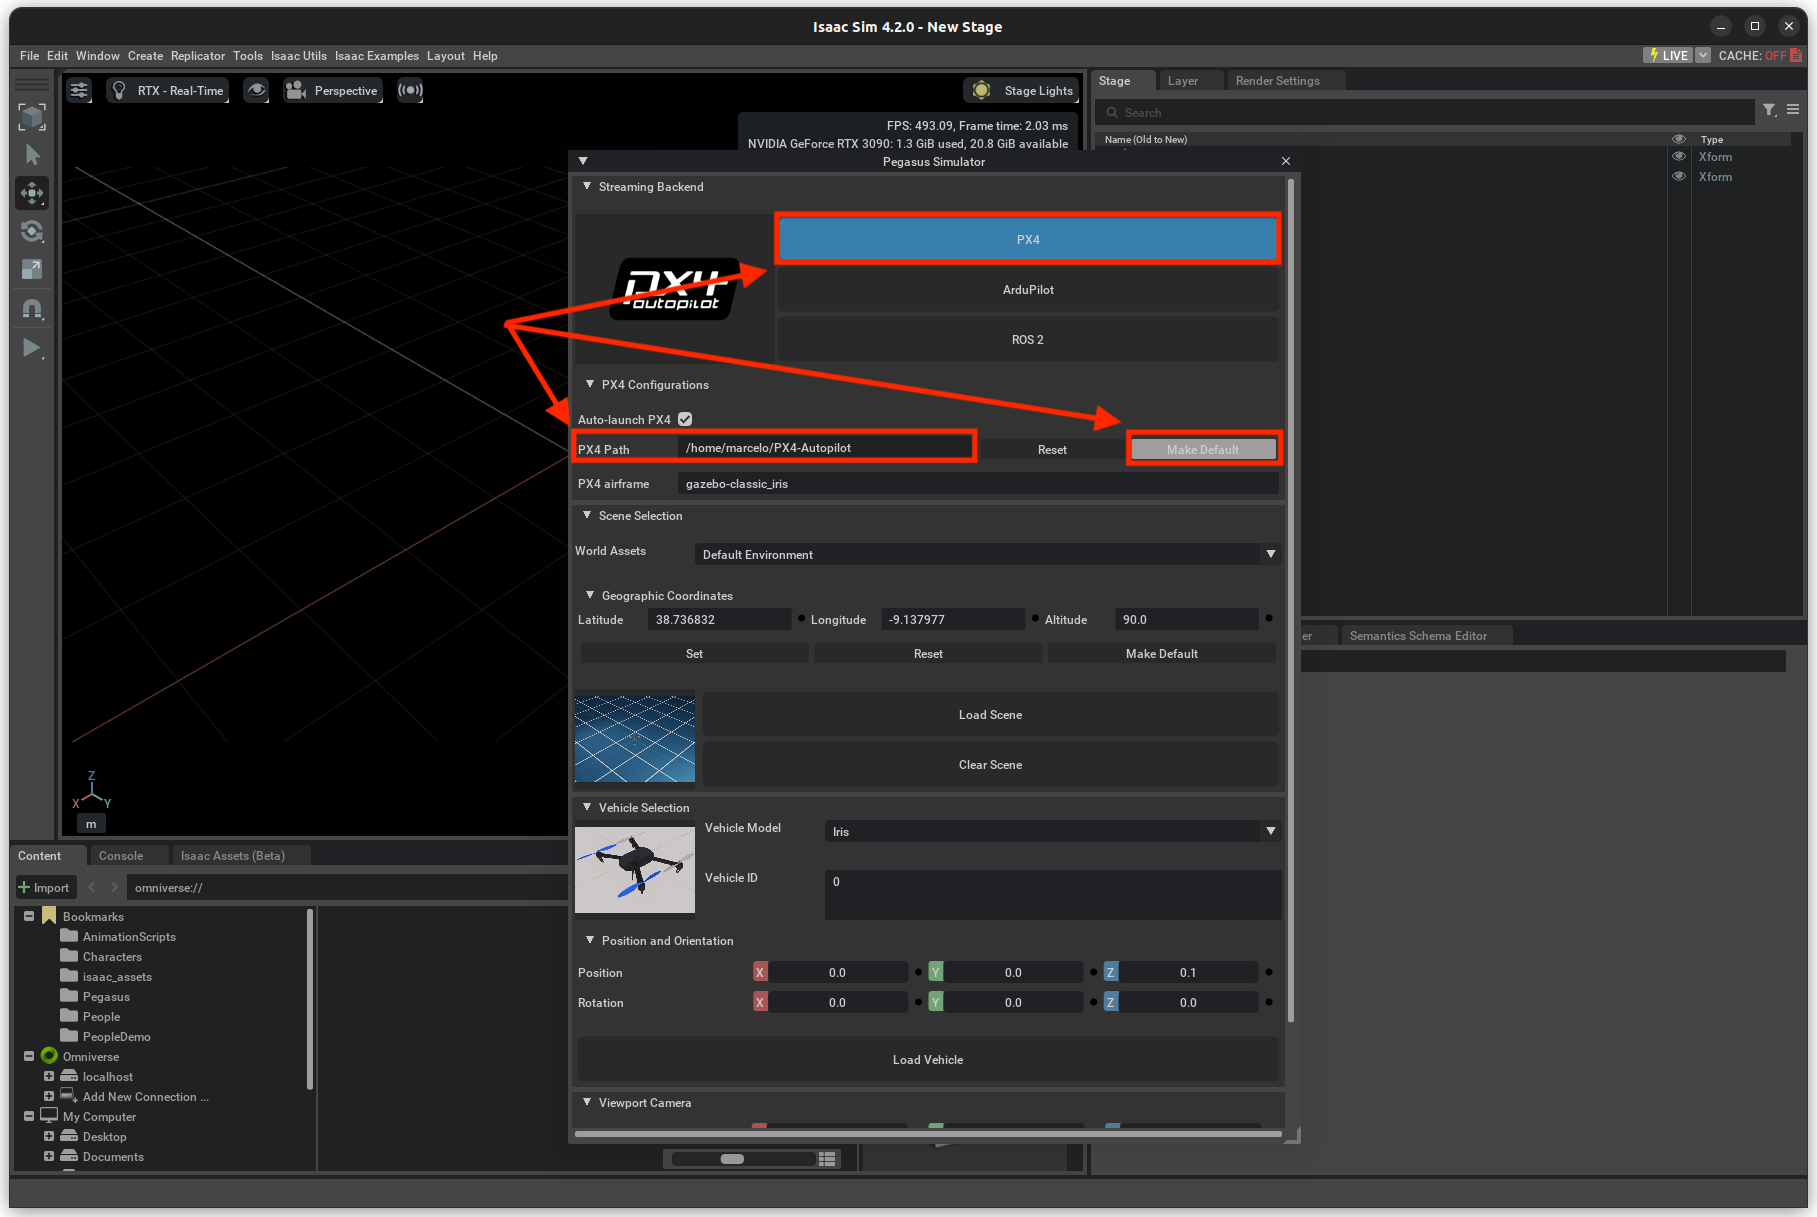
Open Isaac Sim and provide the path to the PX4-Autopilot repository in the PX4 Path field in the Pegasus Simulator window. Press the Make Default button to set the PX4-Autopilot path as the default path for the Pegasus Simulator:
Install QGroundControl
QGroundControl is a ground control station (GCS) for drones. It provides a user interface for controlling and monitoring the drone.
First, open a terminal and run the following commands to install dependencies:
$ sudo usermod -a -G dialout $USER
$ sudo apt-get remove modemmanager -y
$ sudo apt install gstreamer1.0-plugins-bad gstreamer1.0-libav gstreamer1.0-gl -y
$ sudo apt install libfuse2 -y
$ sudo apt install libxcb-xinerama0 libxkbcommon-x11-0 libxcb-cursor-dev -y
Logout and login again to enable the change to user permissions.
Next, download the latest QGroundControl.AppImage.
Make the AppImage executable:
$ chmod +x QGroundControl.AppImage
You can run QGroundControl by double-clicking on the AppImage file or by running the following command in the terminal:
$ ./QGroundControl.AppImage
Install Isaac ROS
VSLAM UAV utilizes the Isaac ROS Visual SLAM package for the VSLAM pipeline. This is a ROS 2 package that provides a set of tools and libraries for building and deploying visual SLAM applications.
Start by installing Git LFS to pull down large files:
$ sudo apt-get install git-lfs
$ git lfs install --skip-repo
Next, create a workspace for Isaac ROS:
$ mkdir -p  ~/workspaces/isaac_ros-dev/src
$ echo "export ISAAC_ROS_WS=${HOME}/workspaces/isaac_ros-dev/" >> ~/.bashrc
$ source ~/.bashrc
Next, clone the Isaac ROS Visual SLAM repository:
$ cd ${ISAAC_ROS_WS}/src
$ git clone -b release-3.2 https://github.com/NVIDIA-ISAAC-ROS/isaac_ros_common.git isaac_ros_common
Install the required packages:
$ sudo apt-get install -y curl jq tar
Then, download the required isaac_ros_visual_slam assets:
$ cd ${ISAAC_ROS_WS}
$ git clone https://github.com/bandofpv/VSLAM-UAV.git
$ cd ${ISAAC_ROS_WS}/VSLAM-UAV/vslam/setup
$ ./isaac_vslam_assets.sh
You can now build the Isaac ROS Docker image:
$ cd ${ISAAC_ROS_WS}/src/isaac_ros_common
$ ./scripts/run_dev.sh
This script will automatically build the Docker image and open it in a Docker container.
VSLAM UAV Docker Image
You can now build the VSLAM UAV Simulation Docker image via the following commands:
$ cd ~/VSLAM-UAV/docker/sim
$ ./run_docker.sh
This script will automatically build the Docker image and open it in a Docker container.
Launch Simulation
Open QGroundControl via the AppImage file you downloaded earlier:
$ ./QGroundControl.AppImage
Next, in a new terminal, open the VSLAM UAV Simulation Docker container:
$ cd ~/VSLAM-UAV/docker/sim
$ ./run_docker.sh
Inside the Docker container, launch mavrospy:
$ cd ~/VSLAM-UAV/sim
$ ros2 launch mavrospy.launch.py
You can specify the flight pattern via the pattern argument. If unspecified, it will default to square.
$ ros2 launch mavrospy.launch.py pattern:=spiral
Available Patterns: square, square_head, circle, circle_head, figure8, figure8_head, spiral, and spiral_head. Where _head will specify the drone to face in the direction of motion.
In a new terminal, open the Isaac ROS Docker container:
$ cd ${ISAAC_ROS_WS}/src/isaac_ros_common
$ ./scripts/run_dev.sh -b
Then, initialize the Isaac ROS Visual SLAM pipeline:
$ cd ${ISAAC_ROS_WS}/VSLAM-UAV/sim
$ ./isaac_ros_vslam.sh
In a new terminal, attach to the Isaac ROS Docker container:
$ cd ${ISAAC_ROS_WS}/src/isaac_ros_common
$ ./scripts/run_dev.sh
Then, run Rviz to visualize the VSLAM pipeline:
$ rviz2 -d ${ISAAC_ROS_WS}/VSLAM-UAV/sim/isaac_sim.cfg.rviz
In a new terminal, run Isaac Sim:
$ cd ~/VSLAM-UAV/sim
$ ISAACSIM_PYTHON isaac_sim.py
Isaac Sim will open up and display a quadcopter model. The simulator will automatically connect to your QGroundControl application. Look for Received first heartbeat at the bottom of the window.
Navigate to your QGroundControl application and click on the text that says Hold to change the mode to Offboard.
You can close the Isaac Sim window using the x at the top right and press CTRL+C in the MAVROSPY container to close the simulation.